

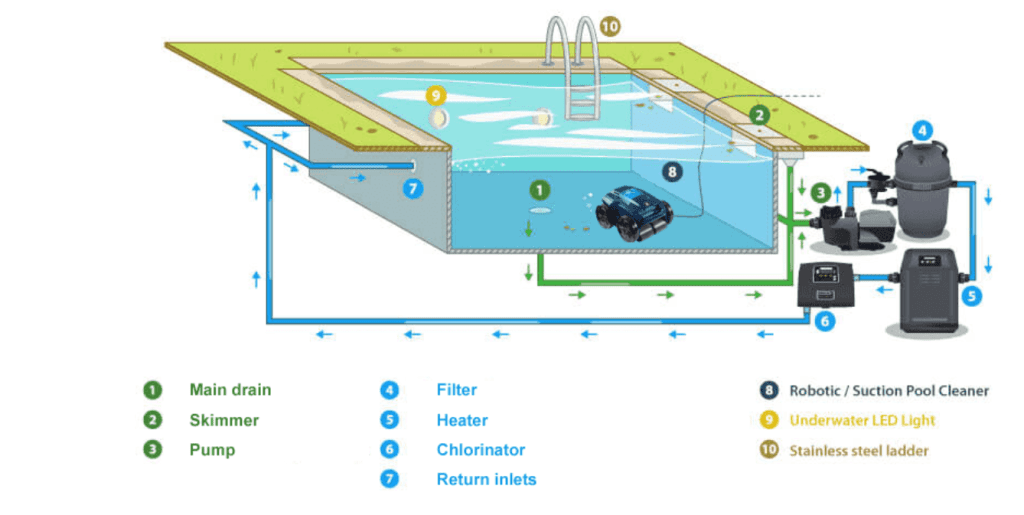
Water inlets are your pool’s lifeline. They push filtered water back into the pool, keeping it clean and safe. If installed poorly:
- Dead zones form (areas with no water movement), leading to algae growth.
- Uneven chemical distribution causes skin/eye irritation.
- Pump strain increases energy bills.
Why Inlet Placement Matters
Water inlets are your pool’s “heartbeat.” They push filtered, treated water back into the pool, keeping it clean and safe. If installed poorly:
- Dead zones form (areas with no water movement), leading to algae growth.
- Uneven chemical distribution causes skin/eye irritation.
- Extra strain on pumps hikes energy bills.
Let’s avoid these issues!
Step 1: Inlet Placement Tips
Step 1: Calculate How Many You Need
- Small pools (under 12,000 gallons): 2–4 inlets.
- Medium pools (12,000–25,000 gallons): 4–6 inlets.
- Large pools (25,000+ gallons): 6–8+ inlets.
- Tip: Ask your pump manufacturer for exact numbers based on flow rate.
Step 2: Avoid Dead Zones & Swirls
- Circular pools: Space inlets evenly around the edges.
- Rectangular pools: Place inlets on opposite walls to create a “figure-8” flow.
- Install inlets in curved areas of kidney-shaped pools to prevent stagnant water.
Step 3: Floor vs. Wall Inlets
Type Best For Installation Tips
Floor Inlets Lap pools, shallow areas Align between lane markers; avoid clogging debris.
Wall Inlets Most residential pools Install 0.5–1m below waterline; angle slightly downward.
Special Case: Diving Pools
Deeper pools need two rows of staggered inlets:
- Upper row: 1m below the surface.
- Lower row: 0.5m above the floor.
- Why? This prevents strong currents near the surface that could endanger divers.
Step 2: Building Better Inlets
1. Choose the Right Shape & Size
- Flared openings (like a trumpet) reduce pressure on pipes.
- Rule: Inlet width = 2x pipe diameter (e.g., 4cm pipe → 8cm inlet).
2. Grilles: Your First Line of Defense
- Material options:
- Plastic: Cheap but cracks in sunlight.
- Stainless steel: Rust-proof and durable (best for saltwater pools).
- ABS polymer: Lightweight and chemical-resistant.
- Gap size: Keep under 5mm to block hair/debris.
3. Control Water Speed
- Too fast (>1 m/s): Feels like a “jet stream,” wastes energy.
- Too slow: Water doesn’t reach all areas.
- Fix: Install adjustable valves to fine-tune flow.
Part 3: Avoid These 5 Common Mistakes
Mistake 1: Ignoring Local Codes
Example: Florida requires anti-entrapment grilles for child safety. Always check regulations!
Mistake 2: Using Cheap Materials
A 10 plastic grille might save money now but cost
10 plastic grille might save money now but cost 200+ in repairs later.
Mistake 3: Overlooking Maintenance
- Monthly: Check for cracks or blockages.
- Annually: Replace worn grilles and O-rings.
Mistake 4: Wrong Angles
Inlets angled upward push debris to the surface. Angle them downward slightly.
Mistake 5: Forgetting About Aesthetics
Match grille colors to your pool tiles (e.g., white for costal styles, black for modern).
Part 4: DIY vs. Hiring a Pro
When to DIY
- You’re replacing old inlets (same size/location).
- The pool has easy access (no digging required).
When to Hire a Pro
- Building a new pool or moving inlet locations.
- Working with concrete/gunite (specialized tools needed).
Cost Tip: Labor averages 50–
50–100 per inlet. Skipping professional help could void warranties.
Part 5: Troubleshooting Common Issues
Problem: Weak Water Flow
- Causes: Clogged filter, closed valves, or undersized pump.
- Fix: Clean filters first. If issues persist, call a technician.
Problem: Noisy Inlets
- Gurgling sounds: Air in the pipes → Check pump seals.
- Rattling: Loose grille → Tighten screws or replace.
Problem: Algae Near Inlets
- Reason: Dead zones → Re-aim or add more inlets.
Bonus: 3 Tips for Energy Efficiency
- Use variable-speed pumps to match flow needs.
- Install timers to run circulation during off-peak hours.
- Pair inlets with skimmers for better debris removal.
Final Checklist Before You Start
✅ Confirm inlet quantity with pump specs.
✅ Buy corrosion-resistant materials.
✅ Mark positions with chalk (double-check measurements!).
✅ Test flow direction before sealing pipes.
Remember: Good inlet setup does two things:
- It keeps your pool clean and welcoming,
- It saves you time on maintenance.
By following these steps, you’ll avoid headaches and enjoy crystal-clear water all season long!
